
Are you wondering how to write a blog post for your real estate blog?
Wild guess: you didn’t get into real estate expecting to be a blogger, right? Well, in today’s market, being a competent blogger is a building block toward becoming a great agent. Blogging is quickly transitioning from competitive advantage to absolute necessity in the real estate world, and the earlier you embrace this new business model, the better it will serve you.
If you’re not entirely convinced you need to maintain a blog, check out 5 Reasons Every Agent Need a Strong Blog before you dismiss it.
Once you understand why a blog is such a great way to boost your business, you’ll want to know how to write a blog post that will resonate with your audience. A post that will provide value, encourage engagement, and increase leads.
And that’s what we’re talking about today: How to Write a Blog Post (in 7 easy steps!)
This post was originally published in 2018. This is the new and improved version.
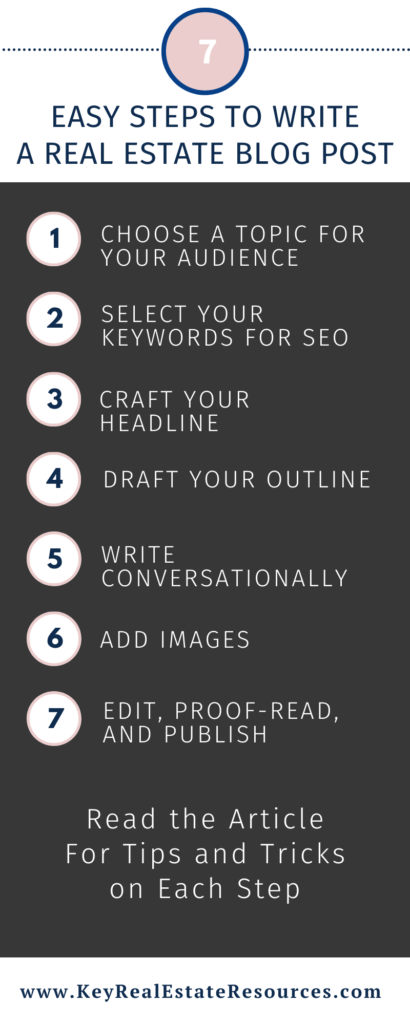
How to Write a Blog Post (in 7 Easy Steps!)
This easy 7-step process will take you from idea to clicking “publish”. And will ensure that you’re publishing the right content for your business.
Let’s jump right in!
1. Choose a Topic with Your Audience in Mind
Good blogging is always about providing value to your audience. What does your audience care about? What do they need to know? How can you present it in a clear, concise, (and maybe possibly even entertaining) way?
Your audience is mostly former, current, and future buyers and sellers, right? Sellers need staging and pricing advice. Buyers need to know what to expect throughout the searching and buying process. Homeowners need home maintenance tips, tricks, and reminders. Engage your future buyers now by explaining how to save for a down payment and closing costs. Reach future sellers by promoting the benefits of upgrading, down-sizing, or moving to the new up-and-coming neighborhood.
One of the best ways to choose blog topics is to answer FAQs. You get the same few questions constantly, right? Answer each one in detail in a blog post. As an added bonus, when future clients ask the same question, you can direct them to your blog post or copy and paste the relevant sections of the post to them.
Need a little blog topic inspiration? Just enter your email below, and our 100+ Blog Topics for Realtors® will be delivered to your inbox.
2. Select Your Keywords and Think SEO
If you’re new to blogging, you might want a little crash-course in SEO (search engine optimization). Here’s what you need to know about SEO and your real estate website (including your blog posts).
I recommend choosing your SEO keywords before you start writing so you can have them in the back of your mind. If they’re in the back of your mind, you’ll be subconsciously looking for ways to naturally fit them in. It’s much easier than writing a post without any thought to keywords, then trying to select them and squeeze them in later.
For this post, I knew I wanted to address common questions about the blog post writing process. I typed “Blog post writing” into the completely free Google AdWords Keyword Planner Tool (again, check out our Intro to SEO post for more on this tool). And found a perfect keyword option: “how to write a blog post”.

Notice the low competition and a high search volume. That’s the sweet spot. Plus, “How to” articles are popular. They’re easy for the writer to organize and for the reader to consume. So “how to write a blog post” became my keywords for this post, and I’m kinda, sorta, thinking about them as I write.
But balance is your friend in the keyword game. Don’t overdo it with your keywords (known as “keyword-stuffing”). It makes your post difficult to read and it’s a red flag for search engines that your quality might not be top-tier.
3. Craft Your Headline
People need a reason to read your blog post. Your headline should give them a reason. It should call out to them from their social feeds, Google searches, and email inboxes.
A lot goes into crafting the perfect headline. You want it to incorporate your keywords, be the right length, convey the right tone, etc. Lucky for all of us, there’s a free tool to help. I always run my headline ideas through the Headline Analyzer by CoSchedule. It scores your headline (aim to get over 70), and it provides helpful feedback to improve your headlines.
Take the headline to this post as an example: How to Write a Blog Post in 7 Easy Steps. Here’s my headline analyzer score:

The Headline Analyzer might not be perfect, but it provides helpful guidance, especially when you’re just getting started and aren’t completely sure what will work best for your target demographic.
4. Draft Your Outline
Armed with your keywords and your headline, you can draft the outline for your post.
You might remember essay outlining from school. It’s basically just organizing your ideas so your post will flow logically and be easy to follow.
Here’s my outline for this post:
Intro
How to Write a Blog Post (in 7 Easy Steps!)
1. Choose a Topic with Your Audience in Mind
2. Select Your Keywords and Think SEO
3. Craft Your Headline
4. Draft Your Outline
5. Fill in Your Outline with Conversational Writing
6. Add Images
7. Edit, Proofread, and Publish
Tips for Faster Writing
Plan your blog posts in advance.
Try using a timer.
Save the intro and close for last.
Close
Creating an outline is also an easy way to determine where (and what) your headers will be. You’re not writing a novel. You need to break up the wall of text with informative headers. It makes your content far easier to digest. Your busy readers can also easily scan your post to find the specific info they came for.
We’re living in a world of over-information, and people will give up on your post if they get overwhelmed by a wall of text.
5. Fill in your Outline with Conversational Writing
So you’ve done all your foundation work and you’re ready to actually start writing. The best advice I can offer on writing is to write as if you’re having a conversation with a friend. You don’t need to stick to the traditional grammar rules in blogging. Ending sentences with a preposition isn’t something to worry about. Neither are sentence fragments. And you can absolutely begin a sentence with a conjunction.
You also don’t need to contain your complete idea in one paragraph. Long paragraphs are difficult to read on most devices, so break them up to make your readers’ lives easier. Increase your readability further by using short sentences.
As far as writing style is concerned: you do you.
You don’t need to be poetic (thank goodness!). Your readers are most likely looking for solid, frill-free information. Bonus points if you can entertain them while providing that information they came for. But watering down the information with unnecessary digressions and general life philosophies won’t do your audience any favors.
Definitely use your personality and your strengths in your writing. Some writers (even business writers) are born storytellers. They effortlessly spin an engaging story to perfectly illustrate their point (i.e. Malcolm Gladwell). If you’re one of those people, I’m more than a little jealous of you. My stories usually end with the listener saying something like, “…oh…is that it?” So I’m not going to pretend to be a storyteller.
Maybe you’re one of those naturally funny, charming people, whom I’m also terribly jealous of. That plays so well in a blog! Use it!
While you are being all witty and entertaining, I’m going to write to my strengths: no-nonsense, actionable, how-tos. The point is, you know what you’re good at. Stick to that.
But what if I’m just not a writer?
I really encourage you to just give it a try. You have knowledge and experience your competitors don’t. And one of the benefits of blogging is letting your clients get to know you through your posts. So commit to trying just 4 posts: 1 post/week for a full month.
After that, if you hate the process or feel it’s not the best use of your time, outsource it! You can hire professional ghostwriters for your blog posts. In fact, ghostwriting real estate blogs is currently my primary source of income! My 10+ years in various sectors of the real estate industry allow me to write anything from basic buyer/seller tips to complex articles for investors. And you get to publish the posts as your own work, under your own name!
If you’re not going to write your own posts, custom content is the best alternative. Custom content is when your ghostwriter writes content exclusively for your use, targeted specifically to your market. I will warn you, custom content gets expensive. High-quality writers typically charge 8-10 cents per word for non-technical posts. So a solid 2,000-word post will cost somewhere between $160 and $200. And it’s worth every penny in terms of increasing your future leads!

6. Add Images
There are a couple compelling reasons to use images in your posts: 1) They add visual interest, breaking up the wall of text. And 2) they make your post more shareable on social media. Obviously, the more people share your post, the more potential future clients you can reach.
Of course you need to be careful when selecting your images. You don’t want to end up on the receiving end of an image licensing lawsuit.
If you’re just getting started, there are several sites where you can download royalty-free images:
- Pexels
- Pixabay
- Kaboompics
If you want far more image options and more distinction for your brand, you may want to consider a paid service:
Interesting side note: did you know you can make money selling your photos to these stock image sites? Learn how to make money selling stock photos online.
7. Edit, Proofread, and Publish
Editing and proofreading are actually two separate reviews.
Editing: big-picture review of your writing for tone, flow, clarity, etc.
Proofreading: micro review of the grammar, spelling, and punctuation in your already-edited piece.
It’s weirdly difficult to edit your own writing. Because you know what you mean. You are in your own head, so you can see how all the pieces fit together in your post even if the details aren’t clearly laid out to everyone not-in-your-head. The best way to make sure your ideas are properly conveyed in your post is to have someone else read your post and point out anything that doesn’t quite work. Colleagues are a perfect resource because you can do a draft swap once a week and edit each other’s work.
Proofreading is easier to do on your own because it’s more objective.
Here are a couple proofreading hacks for anyone who’s not entirely confident in their own proofreading ability:
- Copy and paste your content into Google Translate so Alexa can read it back to you. You can hear mistakes that your eyes might glance over.
- Use Grammarly to review your work. They offer a basic service for free and a premium service for a monthly fee.
- Outsource your proofreading. Hire a proofreader to run through your work and correct any embarrassing errors. Not sure who to hire? Hire me! Along with writing content, I also provide proofreading services. Head to www.michelleclardie.com for more info on my services and rates.
With your post edited and proofread, it’s time to publish! Congratulations on publishing your new blog post!
Tips for Faster Writing
A blog may be a business necessity, but I understand that you’re not a full-time blogger. You have other things you need to get to! So before we call it a day, let’s go over a couple quick tips to help you write faster.
Plan your blog posts in advance.
I’ve lost hours of my life to staring at a cursor blinking on a blank screen, thinking to myself, hmmm…what should I write about this week. Then I start planning my blogging calendar months in advance, and poof! No more wasted time.
In fact, I plan 6 months’ posts in about 10-15 minutes. Here’s how:
Set a timer for 10 minutes and list as many blog topics as you can think of in that 10 minutes. Don’t edit yourself; just list every possible topic that comes to mind.
At the end of 10 minutes, review your list. You’ll notice that you can easily group some of the topics into categories (like For Buyers, For Sellers, Financing, Home Maintenance, etc).
Some bloggers use “theme” months to deep dive on a topic. I don’t recommend this for real estate agents because that would completely alienate a portion of your audience for weeks at a time. Instead, mix things up. Speak to buyers one week and sellers the next. First-timers one week and real estate investors the next.
Of course you can use our 100+ Blog Topics for Realtors® (mentioned previously) as a head-start. Here’s the form again in case you passed it by earlier.
Need more of a head start than just a list of blog topics? You can purchase complete real estate blog content calendars on Etsy! Topics have already been scheduled, keywords have already been researched, and titles have already been crafted for you.
Try using a timer.
You know how tasks expand to fill the amount of time available? If you find yourself spending 8 hours on a post because you can, try using a timer to create your own limits.
I like to set the timer for 5 minutes to do the outline, 30-90 minutes to write the body of the post (depending on the detail and research required), 10 minutes to write the intro and close, and 10 minutes to edit and proofread. You can take or leave those numbers. They just work for me personally.
Save the intro and close for last.
The first sentence is the hardest sentence to write. Actually, I always struggle with the entire intro. And you know getting started is always the hardest part of any task!
So I like to skip the difficult intro section and start writing with my first main point. I fill in all my points, then go back and write the intro and the close once I’m on a roll. Much easier and much faster.
Get a Small Win
To close, I like to give my readers a small, actionable step they can take to start their journey toward their goal. Great victories are made possible by small wins, after all.
If you’re reading this post (all the way to the end, no less!), your goal is probably to learn how to write a blog post. And the best way to learn is to practice. So your Small Win for today is to create your list of blog topics and commit to four of them: 1 post per week for the next 4 weeks.
Have questions or other blog writing tips you’d like to share? Let us know in the comments.
Happy Writing!

Hi would you mind sharing which blog platform you’re using? I’m planning to start my own blog in the near future but I’m having a difficult time deciding between BlogEngine/Wordpress/B2evolution and Drupal. The reason I ask is because your design seems different then most blogs and I’m looking for something unique. P.S Sorry for getting off-topic but I had to ask!
Hi there, Genie!
I created this site myself using Word Press for content management (it’s FREE and perfect for blogging!) Bluehost for hosting (use my link to get a discount!), and WP Residence as the design theme (buy a lifetime license for just $59!).
Here is a post explaining how those elements fit together to help you make your own website: How to Launch Your Own Real Estate Website.
And if you need a little extra help, just email me at michelle@realestatesidehustles.com. All the best to you!
Valuable info. Thanks xD
Thanks for sharing, this is a fantastic blog article.Thanks Again. Really Great.