How to Build Your Real Estate Mailing List
How big is your real estate mailing list today?
Maybe you’re a brand new agent with a list of email addresses for your friends, family, and acquaintances. Maybe you’ve been in the business a while so you also have your previous clients’ addresses.
But how do you grow your list beyond that point? How do you start collecting email addresses for prospective buyers and sellers? Without buying leads or paying for advertising!
That’s exactly what we’re going to cover in this post: how to add qualified leads to your real estate mailing list without buying them or gaining them through paid advertisements.
If that sounds too good to be true, well, there is a catch. You need to consistently invest a bit of time and energy to build your real estate mailing list. It takes some work, but it’s well worth it in the end. The upside to investing in your mailing list is that you can open direct lines of communication with potential buyers and sellers. You can start nurturing relationships long before the prospects are ready to take action so that you are at the front of their minds when they’re ready to buy or sell.
If you commit to making this work, you’ll be rewarded with dozens of qualified leads every month!
So what is this method that can magically fill your mailing list with contact information for qualified leads? Welcome to the wonderful world of lead magnets!
Introduction to Lead Magnets
Lead magnets (also called “content upgrades” or simply “freebies”) are digital downloads you can give away in exchange for an email address.
Have you ever entered your email address in a form on a website to receive a free checklist or template? That was a lead magnet! You gave the owner of the website your email address and your permission for them to email you periodically. And, in return, they gave you a valuable resource.
How about a couple specific examples from this site? My most popular lead magnets are:
- The Real Estate Website Checklist. This checklist helps you optimize your website for lead-generation and managing multiple income streams. You can enter your email for this free resource in the form on the right-hand side-bar (which is at the bottom of the screen if you’re using a mobile device). And I have a pop-up that calls for your attention when you scroll down to a specific point on the page.
- 100+ Blog Topics for Real Estate Blogs. This list is really helpful for any agent needing ideas for topics to write about on their real estate blogs. Anytime I write a post about how to start and manage a real estate blog, I include this form so readers can provide their email addresses in exchange for the list:
Then I have a few uber-specific lead magnets for posts that appeal to only a small percentage of Real Estate Side Hustlers (like a Property Tax Appeal Pitch sample for agents interested in making money with property tax appeals).
Anyone can enter his or her name and email address in the forms on this site. The moment that happens, an email with the corresponding freebie is automatically sent to the email address provided, and the contact is automatically added to my mailing list.
And because I’m collecting email addresses, I can contact readers directly when I have new posts or products that would be useful or interesting to them. It’s a win-win!
By the way (this should go without saying, but I’m going to say it anyway), abusing your mailing list is a quick way to lose all credibility with your growing audience. Email your audience only when you have something that could truly help them in some way. Never spam them with a bunch of promotional emails. And don’t even think about selling your email list to a third party!
What You Need to Start Growing Your Real Estate Mailing List
You really only need 2 things to start growing your real estate mailing list: a website and a solid blog (even if your blog is brand new).
If you already have a website with a blog
You’re ahead of the game and ready to start growing your mailing list today!
If you have a website without a blog
Today is the day to start planning your blog! We talk a lot about real estate blogging here at Real Estate Side Hustles because 1) blogging can generate its own income, and 2) blogging is the best long-term solution to creating a consistent stream of completely passive leads for your real estate business. Blogs are the single most under-utilized tool in real estate marketing, and the sooner you understand that high-value blogs are a cornerstone for the new generation of high-value agents, the better off your real estate business will be!
We have some great resources for taking your first steps into blogging:
How to Crush Your First Real Estate Blog Post
5 Real Estate Blog Topics to Boost Your Brand
How to Write a Blog Post in 7 Easy Steps
If you don’t have your own website or blog yet
Today is the day to build your real estate website. In today’s market, you need to focus on your own branding instead of relying on your Broker’s. Believe it or not, you can build your own website without hiring a web designer. I’m not at all tech-inclined, but I’ve built multiple sites, including this one, completely on my own.
Check out How to Build a Real Estate Website for completely free step-by-step instructions on building your own website. It’s easier than you might expect, and DYI-ing your site will save you thousands of dollars!

6 Steps to Growing Your Real Estate Mailing List
With those preliminaries out-of-the-way, we can now talk about 6 steps you can take to grow your real estate mailing list.
Step 1. Choose an Email Service Provider (ESP)
First, you’ll need to choose an Email Service Provider (ESP). This is the vendor you’ll use to create forms on your site, collect/store email addresses, and automatically email your mailing list.
There are hundreds of ESP’s to choose from, but my recommendation is to choose between MailerLite and ConvertKit.
MailerLite is a perfect start for newbies. It’s completely free for email lists under 1,000 email addresses. And their fees are inexpensive as you grow. It covers all the basic functions you’ll need to manage your real estate mailing list.
As you grow, you may want to consider a more robust service, like ConvertKit. They offer more advanced features and functions and are still reasonably priced for all the bells and whistles you get!
Step 2. Create a Valuable Freebie
Now, you need to decide on a primary lead magnet. Your primary lead magnet should:
- appeal to most people in your target audience
- qualify your traffic so only quality leads are added to your list
- be valuable enough to your audience that they are willing to give you their email addresses
It’s ok if your primary lead magnet doesn’t appeal to everyone you want to reach. You can add more tailored content upgrades to individual blog posts to capture specific interests. A Buyer’s Guide is a great example of a valuable lead magnet. You can invest the time in creating a buyer’s guide from scratch in a program like Canva. Or you can buy a customizable template on Etsy and have your lead magnet ready to go TODAY.
Need more ideas for your first Lead Magnet? This feels like the perfect opportunity for me to offer you a freebie! Just enter your name and email below to get a list of 10 Perfect Lead Magnet Ideas for Real Estate Agents.
Step 3. Build a Form (or 3!) for Your Freebie
The specifics of how to build your forms will vary depending on your ESP. But you’ll likely be able to make 3 different form types:
- Popups. Your form will pop up on your readers’ screens at a chosen point. You can have the form pop up immediately, or after the reader has been on the page for a certain amount of time, or once the reader scrolls down to a designated point on the page. Popups are effective, but can be annoying to your readers. Use them sparingly!
- Landing Pages. Your form will have its own dedicated web page. This is great if you want to promote your freebie on social media! Instead of sending your readers to a blog post where they may or may not find your form, you can direct them to a landing page where the only action for them to take is to enter their email to receive the freebie. It’s nice and clean for your social media followers.
- Embedded Forms. This is the type of form you see in the middle of my blog posts and in my right-hand side-bar. You can embed these forms wherever they naturally fit in your website content.
All 3 types have their own strengths, and you’ll want to use all three types to promote your primary lead magnet.
MilerLite and ConvertKit both offer tutorials to walk you through the steps you need to take to build your forms. They even offer templates for those of us who are design-challenged!
Form Components
Regardless of which form type you’re working with, your form includes these basic components:
- An offer (a little blurb about your freebie).
- Fields for the reader to enter his or her information. This could just be name and email. But you could also add fields like phone number, city, and state.
- A button for your reader to click to submit.
- A message to confirm successful submission.
- A subscriber group. You may have separate lead magnets for buyers and sellers, and you want to keep those groups separate so you don’t send a bunch of info on how to sell a home to your first-time buyers.
Step 4. Create an Automation for Your Form(s)
An “automation” or “workflow” tells your ESP what email to send your reader when they enter their email address in your form.
As part of creating your automation, you’ll design an email (right there in your ESP) with a link for the recipient to access your freebie. Notice I said a “link”, not an “attachment”. You usually aren’t able to add attachments to these ESP emails. So you need to store your freebie online and simply provide a link to it in your email.
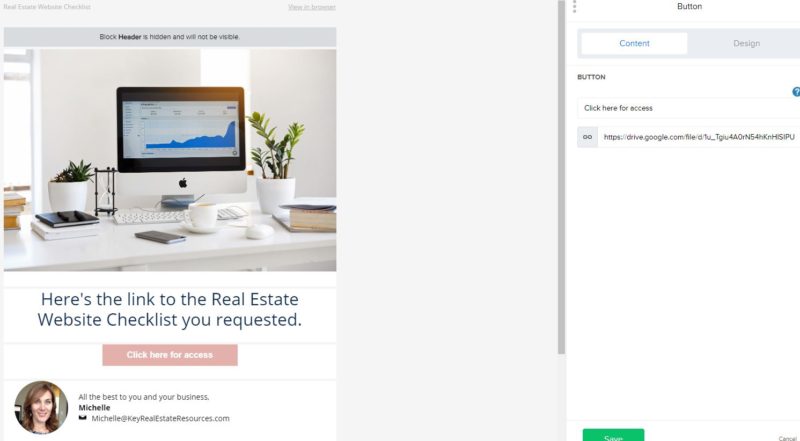
I like to simply upload my freebie as a pdf to my Google Drive (free to anyone with a Google account like Gmail). Once the file is on your Drive, you can get a “shareable link” to that file location. Then use that link for the button in your email that allows your recipient to access the freebie.
That sounds confusing. A picture might help explain it better.
Here’s a screen grab of my Real Estate Website Checklist email from MailerLite. See that red “click here for access” button? You’ll notice on the right-hand side that the button links to my Google Drive file. So when the recipient clicks that button in the email, the pdf file from my Google Drive will open for them.
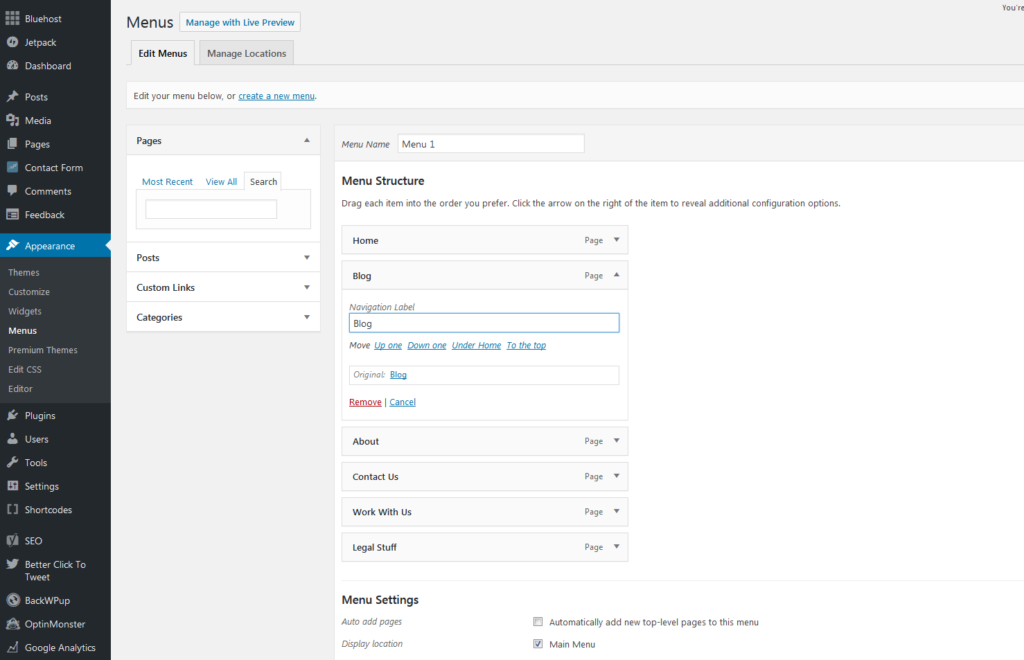
Step 5. Place the Form(s) on Your Website
With your form(s) and automation(s) created, you’re ready to place the form(s) on your website.
This step is the most technically challenging. You need your ESP integrated with your website for popups and landing pages to work seamlessly. If you’re using WordPress for your website (which I absolutely recommend because it presents a polished finish, and it is FREE!), the process is relatively simple. You’ll just need to download a plug-in, which will take care of the integration for you.
Otherwise, you’ll want to consult your ESP’s tutorials to figure out how to integrate it with your site.
Embedded forms are easy to add to any site. Your ESP will provide some code for you to simply copy and paste on your site where you want the forms to appear. Then you’re ready to start growing your real estate mailing list!
Step 6. Drive Traffic to Your Website
But there’s one more step we still need to address: getting traffic to your website so people can find your great freebie!
Most bloggers learn the hard way that traffic doesn’t just magically stumble upon your site once it’s published. The Internet is a big, competitive place. The only way to get your content found is to push it in front of eyeballs.
Naturally, increasing traffic to your website is a topic all its own. Don’t worry, we’ll be posting specifically about that later this month! But how about some basics for now so you can get started?
Social Media
Social media is the best way to spread the word about your website. Facebook, Twitter, Instagram, Pinterest, LinkedIn…wherever your target audience is online is where you need to be posting. But don’t try to dominate every platform. Pick 1 or 2 to focus on (I recommend Facebook and Pinterest to start).
So what do you post to your social accounts? You can post links directly to your Landing Pages so visitors can easily sign up for your freebie. Or you can post links to your blog posts where people can find your popups and embedded forms.
And what if you’re brand new and have 0 social media followers? That’s not as big a problem as you might think. You just need to join a few groups that allow you to post links to your freebie. In Facebook, for example, you can just search something like “San Diego Buyers” then click “Groups” to narrow your search results to groups. You’ll find a few groups of people interested in buying in San Diego. Join those groups, then post to them (responsibly…never spam your groups!). This gives you an audience even if you don’t have one of your own yet!
You can also just join local groups for your community so you can start building relationships with renters or homeowners in your area who may be looking to buy or sell in the future.
Q&A Sites
Have you ever used a Q&A forum site like Quora or even the forums on Zillow, Trulia, or Redfin?
These sites allow anyone to ask a question and anyone to answer the question. They can be a great way for you to promote yourself, your site, and your freebie. Simply scan the forums for recent questions you can knowledgeably answer. If your freebie or a recent blog posts helps answer the question in more detail, include a link for readers to follow to your site.

Parting Thoughts
Before you go, here are a couple parting thoughts to keep in mind as you build your real estate mailing list:
- The first few email addresses are the most difficult to capture. Don’t get discouraged.
- Building your email list takes time. Be patient. You’ll get there.
- Working on your blog and your social media can feel like a waste of time when you don’t see immediate results. But these are long-games. The more content you build up over time online, the higher your Google rank will go, the more leads you’ll get, and the more deals you’ll close!
- Think of your time blogging and posting as a substitute for cold calling. Let the old-school agents cold call and door knock. Your time is better spent focusing your lead generation efforts online where the next gen of buyers and sellers will find you!
This was a big topic today. If you have questions or want me to provide more detail on any of the points we touched on today, let me know. I’m planning future blog posts and want to make sure they’re tailored to answering your most pressing questions. Just leave me a comment!